Change your Webalizer Web-Stats password.
Posted: Wed Feb 28, 2018 4:00 pm
EHCP Force comes complete with a site visitor analysis tool called Webalizer, by default the system is password protected but it is not too hard to guess, so it is best to change it.
On your PC in your browser go to
https://www.YourNewDomain.co.uk/webstats (Replace YourNewDomain.co.uk with you actual domain name)
You will be prompted for a user name and password (screen shot from Firefox)
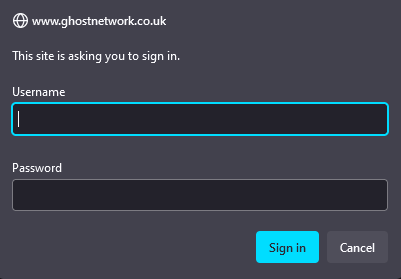
By default the username will be YourNewDomain.co.uk (Replace YourNewDomain.co.uk with you actual domain name) and the password is the user name that set the site up so in our case this should be admin. So log in and have a look around.
So just to recap.
Username: YourNewDomain.co.uk (Replace YourNewDomain.co.uk with you actual domain name) (without the www)
Password: admin (if you set the site up using the admin user)
Now this is not great security as anybody who knows EHCP force could get access.
Ok when you have had a look around close your browser, next log on to your server using your PC and Putty.
The first thing we are going to do is change the username for something less obvious to other EHCP force users.
In order to change the username, we need to edit a file on your server, we need to know the FTP USER NAME that the website was set up under, in our case this was the main admin FTP account we set up earlier in the guide. We also need to know the domain name.
The command would look something like this.
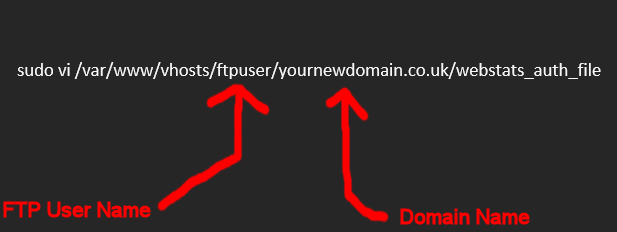
So, if the FTP username is admin, and the website was FredBloggs.co.uk this would be the command.
sudo vi /var/www/vhosts/admin/fredbloggs.co.uk/webstats_auth_file
Assuming you set the main FTP username as admin, then you should just replace fredbloggs.co.uk with your actual domain name.
So go ahead and enter the command (in lower case).

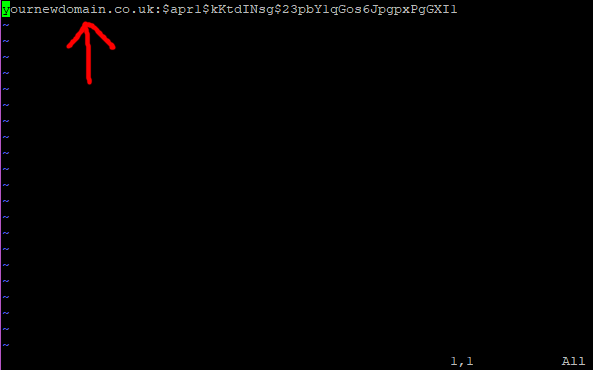
Now be a little bit careful your username is the bit before the : (colon), everything after the colon is an encrypted version of your password (yours will differ from mine)
Ok so press I for insert. SLOWLY press the delete key repeatedly on your keyboard until everything before the colon is deleted.
Your cursor should now be over the colon.

Next type the desired username, I highly recommend setting this to admin to keep things consistent.
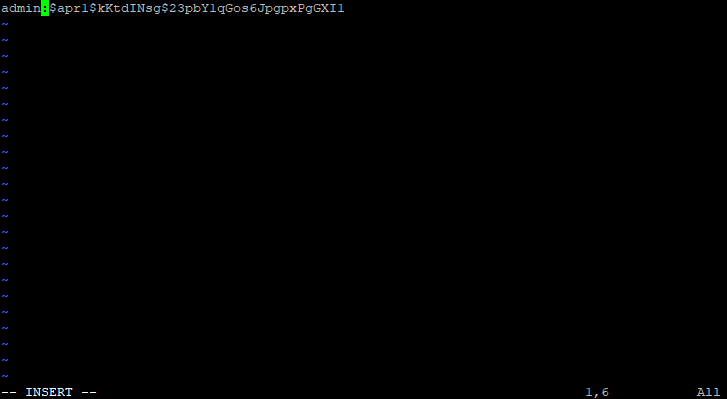
The next bit is the same as normal, we need to save the changes then exit the editor.
Just in case you cannot remember the procedure…….
Press escape, Press : (colon) press w (enter), Press : (colon) press q (enter)
You have now changed the web-stats user name to admin (assuming you used admin).
Ok so let’s change the password.
The command to change the password is similar to the command to change the username.

The FTP username and the domain name are the same as last time, the web-stats username is the username that you changed above. Please note the space before the web-stats username
So, assuming that your FTP user name is admin, the new web-stats user name is admin also and the website was FredBloggs.co.uk, the command would look something like this.
sudo htpasswd /var/www/vhosts/admin/fredbloggs.co.uk/webstats_auth_file admin
If the details are as above, all you need to change is fredbloggs.co.uk to your actual domain name.
So go ahead and enter the command (lower case).

The system will now prompt you for your new password (for the web-stats) so enter your new password.
As per normal in Ubuntu server, you will not be able to see the passwords as you type them.
You will then be prompted to re-type your password so please do so.
The system will now confirm that the password has been updated.

Type exit to close putty.
So now you can test it out by logging onto the web-stats again.
https://www.YourNewDomain.co.uk/webstats (Replace YourNewDomain.co.uk with you actual domain name)
That's it Job Done!
On your PC in your browser go to
https://www.YourNewDomain.co.uk/webstats (Replace YourNewDomain.co.uk with you actual domain name)
You will be prompted for a user name and password (screen shot from Firefox)

By default the username will be YourNewDomain.co.uk (Replace YourNewDomain.co.uk with you actual domain name) and the password is the user name that set the site up so in our case this should be admin. So log in and have a look around.
So just to recap.
Username: YourNewDomain.co.uk (Replace YourNewDomain.co.uk with you actual domain name) (without the www)
Password: admin (if you set the site up using the admin user)
Now this is not great security as anybody who knows EHCP force could get access.
Ok when you have had a look around close your browser, next log on to your server using your PC and Putty.
The first thing we are going to do is change the username for something less obvious to other EHCP force users.
In order to change the username, we need to edit a file on your server, we need to know the FTP USER NAME that the website was set up under, in our case this was the main admin FTP account we set up earlier in the guide. We also need to know the domain name.
The command would look something like this.

So, if the FTP username is admin, and the website was FredBloggs.co.uk this would be the command.
sudo vi /var/www/vhosts/admin/fredbloggs.co.uk/webstats_auth_file
Assuming you set the main FTP username as admin, then you should just replace fredbloggs.co.uk with your actual domain name.
So go ahead and enter the command (in lower case).


Now be a little bit careful your username is the bit before the : (colon), everything after the colon is an encrypted version of your password (yours will differ from mine)
Ok so press I for insert. SLOWLY press the delete key repeatedly on your keyboard until everything before the colon is deleted.
Your cursor should now be over the colon.

Next type the desired username, I highly recommend setting this to admin to keep things consistent.

The next bit is the same as normal, we need to save the changes then exit the editor.
Just in case you cannot remember the procedure…….
Press escape, Press : (colon) press w (enter), Press : (colon) press q (enter)
You have now changed the web-stats user name to admin (assuming you used admin).
Ok so let’s change the password.
The command to change the password is similar to the command to change the username.

The FTP username and the domain name are the same as last time, the web-stats username is the username that you changed above. Please note the space before the web-stats username
So, assuming that your FTP user name is admin, the new web-stats user name is admin also and the website was FredBloggs.co.uk, the command would look something like this.
sudo htpasswd /var/www/vhosts/admin/fredbloggs.co.uk/webstats_auth_file admin
If the details are as above, all you need to change is fredbloggs.co.uk to your actual domain name.
So go ahead and enter the command (lower case).

The system will now prompt you for your new password (for the web-stats) so enter your new password.
As per normal in Ubuntu server, you will not be able to see the passwords as you type them.
You will then be prompted to re-type your password so please do so.
The system will now confirm that the password has been updated.

Type exit to close putty.
So now you can test it out by logging onto the web-stats again.
https://www.YourNewDomain.co.uk/webstats (Replace YourNewDomain.co.uk with you actual domain name)
That's it Job Done!